Calliope News
OK, gang, bottom line: the damned thing works and it’s time for me to get off my fat ass and start writing up the details. The rush to get the thing done and working B4 Maker Fair meant the thing was, to a certain extent, not the ‘preferred embodiment’, but now I’ve got a feel for what that entails and I’m going about making the mods to achieve this.
At the end of this description I’ll copy-and-paste the flyer I made that I was handing out at Maker Fair and RoboGames earlier this month.
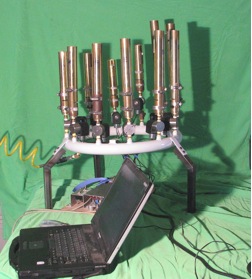
Soooo there are three major widgets that make it all happen: whistles, electronics and software. The whistles are, indeed, Helmholz resonators and they will toot with an amazingly low pressure; i.e. around 2psi is plenty. Up until yesterday I’d needed an air compressor supplying 80psi to the whistle manifold due to the nature of the solenoid valves I had been using for the project. These were designed to operate at up to 10,000psi (!!) and had a narrowing, or aperture, measuring only 0.052″ dia (a #55 drill was a close fit) where the valve piston seated. Just for grins, now that the rush was over, I disassembled one of the solenoid valves and had a go at enlarging this aperture. I didn’t want to have to go the whole nine yards, enlarging the diameter of the piston from .125″ to something else, then boring out its guide, etc so I selected a diameter that was less than said piston to see if I got lucky. Indeed I did!
Doing the math I determined that enlarging the orifice to 0.1015″ (a #38 drill) would quadruple the surface area of the aperture and, to my surprise and delight, this dropped the manifold pressure needed to toot a whistle to exactly one quarter of what was needed before; i.e. now instead of 80psi, it works on 20psi, woohoo! Doing the same to all 12 valves took several hours; managed to bugger up one but I got out one of the 4 spares and got that one right, so I’ve got a full octave of 12 now back on the manifold.
Took the opportunity and roughly tuned all of the whistles, as several had gotten badly detuned by being rattled around in the truck these past weeks.
As for electronics Kris and I were both fairly short on time so she managed to organize prototype electronics into a really elegant little board and got several of them printed up at PCB Express. I did the soldering and then there was a ton of wiring; it’s amazing how long it takes just to connect the dots: days! One problem surfaced pretty quickly: although all of the holes were in the right place we had neglected to add a connector for a programming interface cable! We worked around this by replacing the standard Stamp socket with a ZIF Stamp connector (5 day delay to get ’em mail order, SOP, yes?). Once installed the ZIF slots were roomy enough that there was room not only for the Stamp but also room for a cobbled-together 4-pin ribbon cable connector adjacent to the pins that needed to receive the signals.
All was made tidy and secure inside a model car display box (TAP Plastics: cheap) with the addition of a little hot glue on the ribbon cable where it had to pass thru the box and the system was ready for prime time.
Now that the public events are behind us it’s time to start thinking about version two of the circuit board. For starters it will be larger, if only to accommodate standoff in its four corners (early version had to be double-taped to a block of wood!). There will also be a serial cable connector to get data into onboard memory. The final change will be to add a pair of numbered thumbwheels and a pushbutton so that as many as 100 tunes may be stored and retrieved without recourse to a laptop.
Back on the workbench at long last I wrote a little ‘play scale’ program to help in tuning, but the first thing I noticed is that for some reason I’ve yet to fathom, the lowest note won’t play. I suspect the problem is somewhere in the wiring but I’ve yet to find the source of this problem. Tunes seem to play fine but there are only 11 of the 12 whistles playing.
Once the laptop is superfluous (except for initial loading of tunes) I’m thinking we’ve got a product of sorts.
Which brings us to software. Kris has tweaked the basic Parallax ringtone converter program with the lookup table that converts ringtones to pin out commands and it works a treat.
Now that the learning curve is beginning to level out a bit I’m beginning to think it might be possible to go back and reexamine earlier, smaller versions of the calliope with an eye to making that desktop executive toy viable at long last. A little more work B4 we’re there but the idea tantalizes, hehe.
I’ll add photos when I remember how to add ’em…
———————–
Steamboat Ed’s
Aetheric Musical Machine
Calliopus Minimus
The Ringtone Wrangler
Project Participants:
Concept & construction: “Steamboat Ed” Haas
Driver Board design: Kris Magri
 The Toot-orial
These whistles are technically known as “Helmholz resonators”, chosen only because I discovered an excellent tutorial describing them on the web.
If you’d like to build your own there are photos and text of my build.
These whistles are activated with solenoid valves. These valves came via barter, which is to say they’re not ideal but they were good enough; ya get what ya pay for, eh? The solenoid valves are *explosion-proof and thereby hangs another tale. When buying solenoid valves try to get ones rated for low pressure, with the largest diameter internal passages you can. Larger passages permit lower manifold pressure and a smaller air compressor can be used to make the whistles toot properly. There are many retailers of solenoid valves; here are two well known ones:
Tuning was done with a downloadable program called Chromatia Tuner, available for $19.95 from: http://www.fmjsoft.com/ctframe.html
-To know what note to tune to, you need a table of frequencies for each octave. Here’s a link to one.
-There is a pile of useful acoustic formulae and other files on the Yahoo Whistle Forum.
Control is via Basic Stamp, model BS2. Parallax has easily the best documentation and the best primer available for any microprocessor. I highly recommend the book, “What’s a Microcontroller?”, which comes bundled with a Basic Stamp, the “Board of Education” (their prototyping board) and a kit of parts.
Tunes are NOT MIDI, but RTTTL; i.e. the Ring Tone Text Transfer Language, which tend to be written for limited octave range and which tend to be short, thus conserving compressed air. More on RTTTL can be found via google, but be sure to look for tunes in the nokring format. One good source of tunes I’m mining is here.
Software to use a Stamp to translate RTTTL text files into something that can activate solenoids or other devices requiring high power and FETs can be downloaded from the Parallax forum thread.
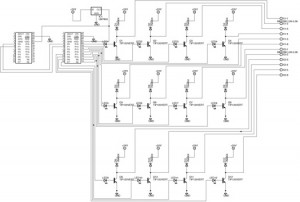
The Solenoid Driver Board interfaces between Stamp and Solenoid valves. Each of its 12 channels can run either a solenoid or a motor rated up to 2 amps at 24v A much improved version of this board will be available shortly. Following is a schematic of the original board if you’re feeling ambitious and want to build your own (!!). If you want to buy a board send email to: calliope@nmpproducts.com and we’ll let you know when they become available.
Bibliography:
-“A Steam Calliopette” by LBSC, Model Enginer Vol 107, #2682
-“Calliope” by Conrad Milster, Live Steam, Jan-Oct, 2003
*With explosion-proof valves I have the option of running the calliope on propane, bwahaha.

My calliope (53 notes, air powered) runs on 7/8th PSI.
John please tell me more: what are you using for valves? That’s my current bottleneck, literally: the orifices on the valves I’m using are too small!
we always use air compressors in spray painting and also in blowing off those hardened dust on our home””-
Much water under the bridge since building this rig. Calliope #5 works much better but I’m planning another one with twice the number of notes. Stay ‘tuned’..