| Photo #6: Leading off with the last photo, cuz I'm busy doing a zillion other jobs at present. No telling when I'll get the rest of them done. Sloppy PhotoShop job, but I'll take better photos when they deserve it. |
|
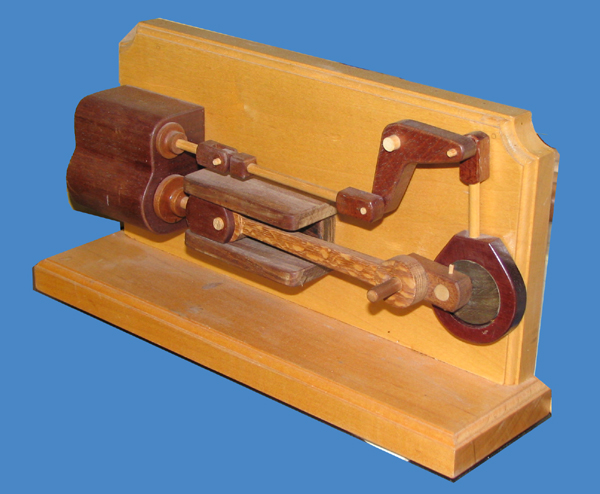
March, '06: Yikes! Talk about sidetracking!! Further down the page you'll see when I started on this project; looks like I missed the deadline! Anyway here's a shot of the finished item, the first of several, but...
| Photo #6: Leading off with the last photo, cuz I'm busy doing a zillion other jobs at present. No telling when I'll get the rest of them done. Sloppy PhotoShop job, but I'll take better photos when they deserve it. |
|
November 24, '02: I've been machining metal for nigh on thirty years (yikes!) but when it comes to woodworking I've always been a plywood-and-biscuits kinda guy. On the occasion of having a few months off, due to the cancellation of the last Battlebots tourney I decided to take the great leap by putting aside the metalworking tools and picking up the woodworking ones instead. After much contemplation I found a pretty neat book: Raymond Levy's "Making Mechanical Marvels In Wood" which has some small, but fairly challenging projects that are very well thought out.
Keep in mind that I don't know one species from another and that I don't have much of an artist's eye either; i.e. the woods I have selected for the various components may look terrible by the time I get the things done; it's a learning experience, as they say... Below you'll find text and photos describing my first attempt to build one of these wonderful contraptions.
| Photo #1: The bottoms of theCrosshead Guides had to have two slots cut into one side. Due to their small size this looked like a dicey job to accomplish on a tablesaw, so I made this set-up for a bandsaw. The slots are slightly wider than the kerf on the blade, so the stops that locate the pieces side-to-side are a little loose. Depth of cut is controlled by positioning the clamped bit of aluminum scrap, lower right in photo, which limits travel of the T-square's long bit. |

|
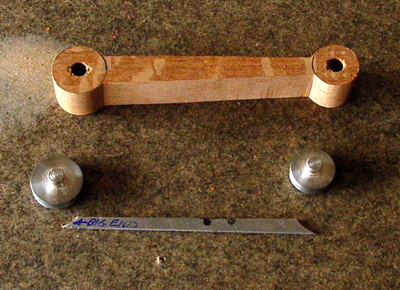
| Photo #2: At first I hoped to finish one component batch per day. All went as planned until the Connecting Rods. Here's a half-finished pair, made of lacewood. First the holes are drilled on each end, then a couple of aluminum tool buttons are pressed into these. The tapered scrap of aluminum rests on these buttons and gives me an indication of where to cut a taper along its length. In this photo the tapers have been cut on the bandsaw, then ends and tapers have been smoothed on a belt grinder. |
|
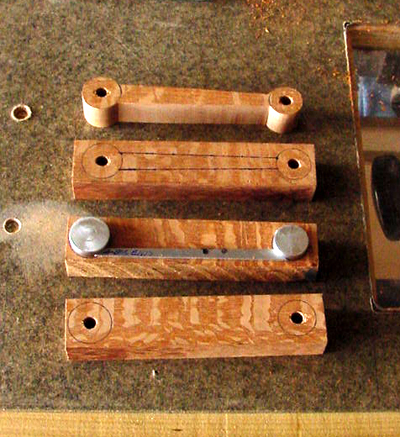
| Photo #3: Bottom to top: some of the steps needed to get the Conn rods roughed out. Next the 3/4" thick stock will be bandsawn in two, making a pair of 3/8" thick pieces. |
|
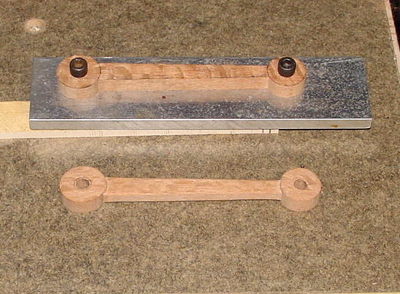
| Photo #4: Next a sanded shape is bolted to an aluminum jig (top) which is then clamped in my milling machine vise. Using a flycutter I relieve opposite sides of the center section 1/16 in. Once removed from the jig the tedious part begins: sitting in front of the TV with the aid of a sharp chisel and some 320-grit sandpaper I remove all the burrs and radius the edges of the center section (bottom). |
|
|
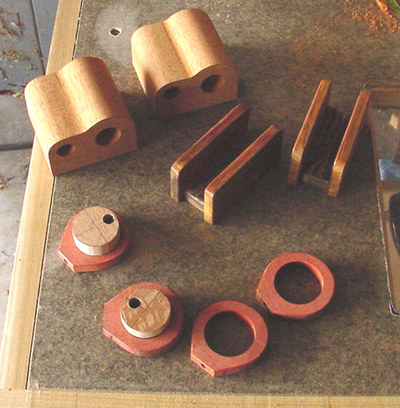
Photo #5: Various components and the woods I've used to make them:
-Mahogany Cylinders "castings"; -Crosshead Guides have bottoms made of Bocote and sides of Cocobolo. -Purpleheart Eccentric Straps (got the grain running the wrong way; oh, well; will do better next time) and Birdseye Maple Eccentrics. -The Connecting Rods (not shown) are made of Lacewood. |
|
Next up: tackle the Rod Ends, which I plan to make from Honduran Mahogany. Once these are done I can begin, at long last, to connect the dots and get a feel for what the mechanism will look like. Assuming there are no horrible color clashes I'll press on from there. Expect more photos next week!
Return to Jigs, Fixtures and Shop Hacks