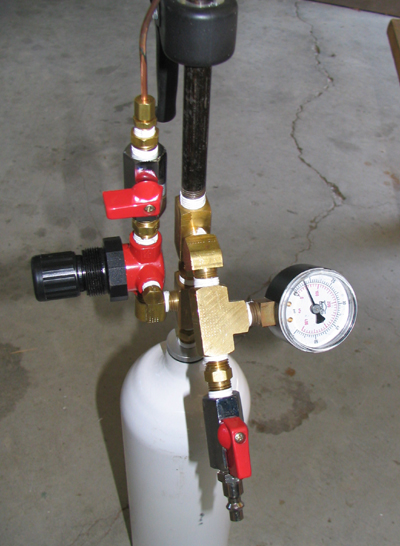
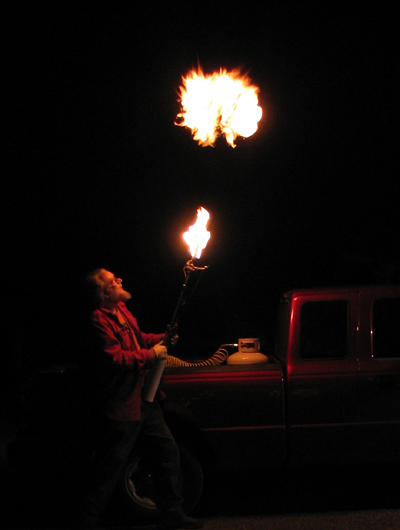
Monday, May 1: OK, so a bit more plumbing and I've done away with the bulky second propane tank for the pilot light. The new rig is slimmer, looks kinda sexy in a hackerly sorta way and works fine in the sense that I can get a steady pilot flame, but it's still yellow and sooty despite adding 6: #10-32 tapped holes. Instead of entraining fresh air, all they do is give the fire additional exits! The final problem is that the fireball that come out when I goose the main whistle valve is not at all impressive. The last thing I did today was add a gauge to measure incoming gas pressure.
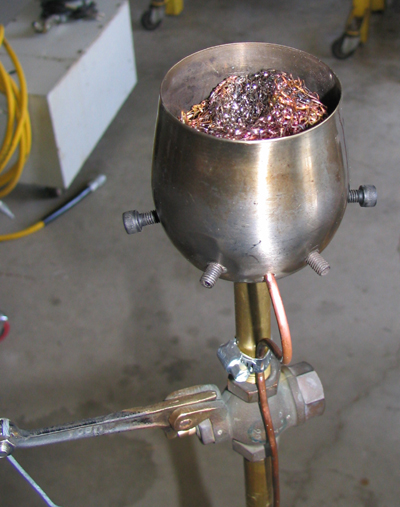
Aha: the light dawns! Propane from a newly-filled tank doesn't exactly peg the pressure gauge; it took fully five minutes for it to register 20psi! When it got to that point I gave the whistle valve a tug and a fairly good blast of fire emerged, pushing the bronze wool half out of the cauldron along the way (gotta remember to secure it better!).
Tuesday, May 2: No great photos yet, but I've made an internal change to the plumbing by adding an exit nozzle for the propane coming out of the main pipe. I tapped the end 1/8" pipe, then threaded in a pipe plug that I had modified. I first drilled a 3/32" hole, then I reamed a gentle taper on the inlet side and countersunk a more abrupt taper on the outlet side, in essence making a rocket nozzle. I'm hoping this will both smooth and accelerate flow. Wait and see; next test at dusk...
Thursday, May 4: Tested the widget at the Santa Rosa Fire meeting last night and it performed adequately. Now on to building unit #2!
Thursday, May 11: Tested unit #2 last night; it works OK but the whistle valve leaks like a sieve: fire shot out all over the place! New pilot light not only leaked, but didn't work worth a damn either. Back to the drawing board on this one. Meanwhile unit #1 still works fine.
Tuesday, May 16: Took a break to mow the meadow; major hay fever a byproduct. But prior to this odious task I had a successful test run of contraption #2 in my driveway! This one differs from the first one by using a hacked propane torch for the pilot light, with standard knob-type valve replacing the small pressure regulator I used on the first unit. I had to do a little machining to connect the dots and, at one point up near the torch head, I had to press two components together, as there wasn't enough meat for threads and I didn't want to silver solder components that would be so hot in use. I might have tigged the joint, but I wanted to try it out first. There were a few leaks, but I've since plugged the nastiest of them using teflon tape on the cooler bits and pipe dope on the hotter joints.
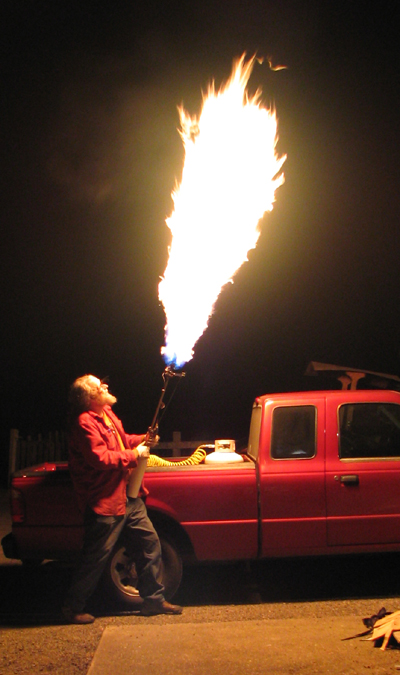
I've also replaced the cauldron that tops the first burner with a whistle on the second one: I was curious to see what would happen if I ran a whistle on propane. To my delight I find that the accoustic properties are very similar. Further, I found that the emerging gasses, once ignited by the adjacent pilot flame, cling to the surface of the whistle on their mad dash skyward. In other words the whistle's body is acting as an aerospike! The result is pretty spectacular. And next time I must remember, that in addition to leather gloves, I should wear ear protectors, too!
I'm now satisfied that my flame effects learning curve and my completed hardware has reached a point where I can start thinking about other matters. Michael Butler and I were chatting about the theme of this year's event, i.e. "Hope and Fear" and he suggested that I put a sea monster beneath the pirate ship. What a great idea! I've been pondering the idea and it seems right on. If I can figure out how to do it right I could use the "body" of a giant squid to conceal the trailer I want to use to haul the propane tank, the auxiliary generator and deep-cycle battery. Tentacles could then snake around the ship, appearing to emerge from the sequenced EL wire "seas" that I've already made. I'm thinking I'll do away with the steel side panels that I had used to display the "seas". Instead I'll wrap them directly onto the sides of a "hull" which also needs to be constructed, probably using muslin on some sort of framework that must curve (in flat segments I suppose) to approximate a more ship-shape contour. I've been looking at various photos of what others have done and I'm starting to like the idea of using the Playa as a reflective surface to create a pool of diffuse blue/green light beneath the car, using cold cathode fluorescents of some sort. So at present these are the remaining tasks:
Thursday, June 8: Finally bit the bullet today and took off the folding side sections that housed the EL wire "ocean waves", using a tubing cutter. Did a nice neat job so I can reconnect them if need be. But for now there are four: 6" tube stubs sticking out, two to a side and that's that. Working on the "hull" will be much easier with them out of the way.
Next up: drill holes in two sheets of 1/4" plywood and slip them over the forward stubs, then see if I can bend the forward ends together and form a "bow". this will require cutting the plywood sections to form tapers in the front and curves on top to make a nice ship-shape contour. Next I figure I'll have to reinforce these thin side sheets to keep the shapes from being all floppy. I'll make a cardboard template, then cut some 3/4" ply to match, forming top and bottom sections that can be screwed into place in the bow. Before I screw them in place for good I'll cut whopping great holes in the middle of the thick stuff to create "windows" that will allow folks to board and me to see the ground clearly as I motate about the playa.
In other news yesterday I took delivery of 700 meters of 1.5mm dia optical fiber. I only needed about a hundred feet of the stuff for another project, but I'm thinking it would look neat having some of it at various points about the ship but I've yet to define where. With luck I'll be able to flog the excess to various pals with projects of their own.
Oh, and re: step #7 above I've made progress in the sense I've found a guy who's both capable and willing to take a whack at the sea monster. He goes by the name InflataBill and not only does he live close by, he's a real character! He's pretty busy with life at the moment but he thinks he can start getting into the sea monster biz before the end of June: woohoo!
Return to the Art Car Project
Return to Steamboat Ed Haas
Please send feedback to: "Steamboat Ed" Haas