Art Car Progress: March-April, '06

Progress on fireball shooters is slow but steady. I've been sidetracked by a couple of production jobs that will hopefully generate a little income to pay for this or that extravagant hobby of mine. At the last Burning Silicon Collective meeting I attended I finally discovered that Bonefire Bob Hoffman, the expert everyone raves about, has a website up where he sells some really beautiful (but expensive!) fireball shooters, all assembled and ready to go. In my quest to save a few bucks I've been trying to find the necessary kit to do my own low-ball contraptions.

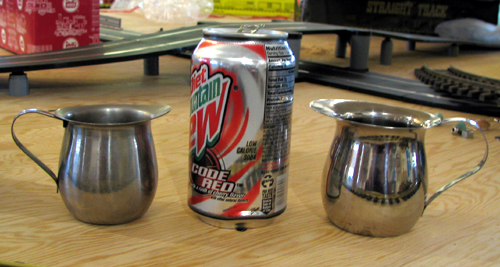
The latest find involves the cauldrons, i.e. the fireball exit nozzles, which have to be shaped juuuust right: from conversations with various fireball shooter builders it seems the best shape is a sort of wine-glass with the top lip curving in from parallel towards the top lip. I suppose it would be possible, after much trial and error, to spin my own on the lathe, but I sensed that something from the "real world" had a very close shape to this and could be hacked. After a few fruitless leads and a couple of dead-end trips to various stores I struck gold at a restaurant supply house. Gotta go back and get more in a few weeks; they only had three and I need four; a few spares would be even better.

Photo #1:I finally found 'em and they were cheap too! These are stainless steel milk dispensers, from old expresso machines. I got three for ten bucks. I'll remove the spot welded handles, then drill a hole bottom center. I'll attach each in turn to a spigot mounted in the lathe chuck. To cut thin stuff like these the trick is to use a slim three-corner file. The edge of the file slowly abrades the spinning steel vessel and the part I don't want (the outward curving lip) will part cleanly. Next I'll enlarge the bottom hole and attach a gas pipe.
Photo #2: On sale at the local hardware store for $69.- including a trailering hitch, this wagon will serve as trailer and hold propane for the fireball shooters, as well as a small Honda generator to top off the batteries I use to drive all of the EL wire and other illuminations on the vehicle. It measures 3ft long inside and a bit over 18" wide and about a foot to the tops of the sides. Once outfitted with tank and generator I'll add tackle to secure both, then add a framework to support generous heaps of EL wire to make it resemble something different, maybe a buoy or a dinghy or...??

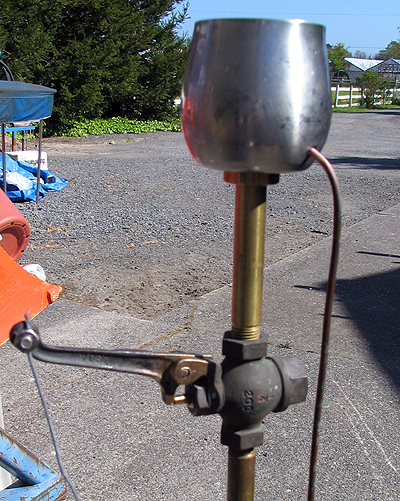
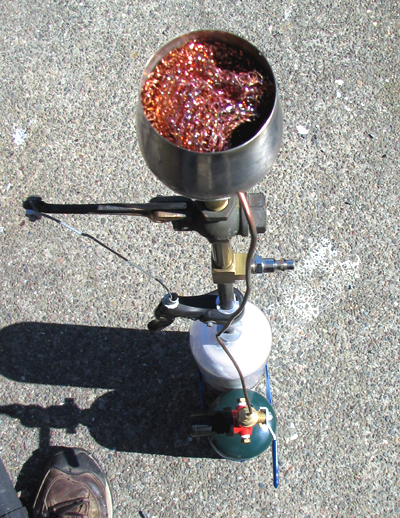
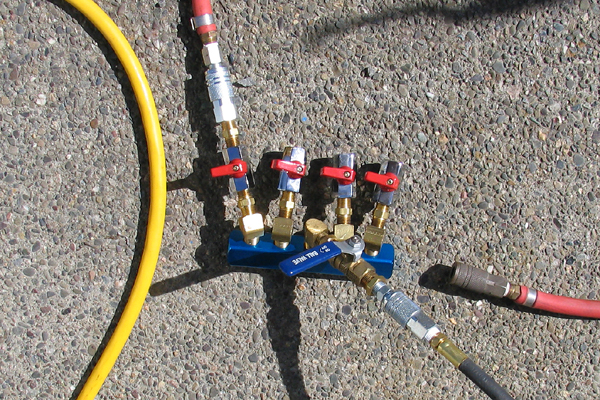
April 29: During the rains I did find a steady source for the milk dispensers; they're a standard item at, of all places, Bed, Bath & Beyond and they didn't cost any more than the ones I got from the second hand restaurant supply place.The rains finally abated last week and I'm back to doing stuff in a no-longer damp and freezing shop. I've finally assembled all of the components to put one fireball shooter together. It ain't elegant, which is to say, although I've got everything I need to try it out, it's not in what I would call the preferred embodiment. I'll be able to do the first full power test after the sun goes down tonight.

Photo #3: Shot of plumbing associated with pilot light. The regulator's out of a bin in my shop and it's rated 300psi. I've got it dialed down to a mere trickle of flow for starters. I added a quarter-turn ball valve for rapid shutoff. From there the propane travels to the "cauldron" via 1/8" o.d. copper tubing. To preserve orientation of valves and plumbing I've temporarily attached the propane tank to the reciever tank with some of that no-residue tape. Eventually I'll make up metal brackets for all four units.
Photo #4: Cauldron is attached to the main string of 1/4" pipe with a couple of machined brass bulkhead nuts. I drilled a 1/8" hole in the bottom side of the cauldron, then just stuffed the end of the copper tube inside. There's nothing fancy holding it in; I'm counting on the stiffness of the tube to do the job. Eventually I'll secure the 1/8" tube to the main string of 1/4" pipe so it will be less likely to get knocked out.
Photo #5: Have yet to find a source of stainless steel wool, so I used a bronze wool kitchen scrubber instead. I fired up the pilot light today and it seems to work fine, although I suspect mixing in more air would help: it didn't take much of a sneeze to blow it out. I plan to drill a bunch of #29 holes around the bottom of the cauldron. I'll tap these #8-32, then thread in bolts. I'll remove bolts until the flame looks to be the right color. Must remember to add more holes than I need, so that I can readjust air flow ratio when I'm in the high desert where the air is thinner. Interesting discoloration from the combustion, yes?
Photo #6: Rough layout of manifold to connect a 5 gallon propane tank to the four 1/4" pipes. I got the (blue anodized) aluminum manifold from Northern Tools. One side is tapped with 5: 1/4" pipe holes on 1-1/8" centers and one: 3/8" pipe hole is in the middle of the opposite side. Ends are tapped 1/4" pipe too. Propane enters the center of the manifold via the black hose, lower left in the photo. Each outlet will have a 1/4" street 45, then a 1/4 turn ball valve, then finish with a female quick-connect. From here the propane can go to one of the four units via red hose.

Return to the Art Car Project
Return to  Steamboat Ed  Haas
Please send feedback to: "Steamboat Ed" Haas